Dust accumulation can restrict airflow, increase fan noise, and contribute to higher component temperatures during demanding games. Learning how to clean gaming PC dust helps maintain effective cooling and reduce unnecessary strain on your hardware. This guide covers preparation, safe cleaning techniques, maintenance schedules, and common mistakes to avoid.
What Cleaning Gaming PC Dust Really Comes Down To
Cleaning a gaming PC involves more than wiping the case or removing visible dust from the fans. Dust collects inside heatsinks, between fan blades, around intake filters, and near graphics card cooling assemblies. These deposits can obstruct airflow and reduce cooling efficiency, making regular internal maintenance an important part of desktop PC care.
1. Why Dust Is a Problem for Gaming PCs
Gaming computers generate substantial heat because their CPUs and GPUs perform demanding calculations while running games. Case fans move cool air across these components, while heatsinks and radiators transfer heat away from processors. When dust accumulates between cooling fins, it restricts airflow and makes heat removal less effective.
A dusty cooling system may cause fans to operate at higher speeds to compensate for restricted airflow. You might notice louder operation, higher temperatures during gaming, or reduced performance when a processor reaches its thermal limits. However, dust is not the only possible explanation for overheating, so temperature changes should be considered alongside other symptoms.
HP® Official Site+2
2. Identify the Areas That Need Cleaning
Before opening the case, identify where dust has accumulated. Front intake filters, bottom-mounted filters, and case fan blades are common collection points. These locations are particularly important because intake fans continuously draw outside air into the computer.
Internal components also need attention. Check the CPU cooler, graphics card fans, GPU heatsink openings, motherboard surfaces, and radiator fins if your system uses liquid cooling. Pay attention to the power supply ventilation grille, but never open the PSU housing. Its internal capacitors can retain dangerous electrical charges even after disconnection.
HP® Official Site+1
3. Prepare the Right Cleaning Equipment
You do not need expensive equipment to remove ordinary dust from a gaming computer. A few appropriate supplies are sufficient for routine maintenance. Using unsuitable cleaning tools can introduce static electricity, moisture, or excessive mechanical force that may damage sensitive components.
Prepare these items before starting:
- Compressed air designed for electronics or an electronics-safe electric air duster with appropriate airflow.
- A clean microfiber cloth for exterior surfaces.
- A soft, clean antistatic brush for stubborn dust on accessible surfaces.
- A screwdriver if your case requires one to remove its panels.
- A clean, well-ventilated workspace.
- A small container for case screws.
Avoid household vacuum cleaners inside the computer. Also avoid using a household hair dryer, ordinary cleaning sprays, or your mouth to blow dust away. Static electricity, moisture, and excessive airflow can create unnecessary risks.
Dell US+2
4. What Doesn’t Help When Cleaning a PC
Some common cleaning habits create more problems than they solve. Wiping exposed electronic components with wet cloths, using excessive compressed-air pressure, or allowing fans to spin freely during cleaning can damage hardware.
You should also avoid removing components unnecessarily. Taking out the graphics card, CPU cooler, or motherboard increases the chance of damaging connectors, cables, or mounting hardware. If ordinary dust removal is sufficient, leave these components installed.
Another mistake is treating cleaning as a substitute for diagnosing every cooling problem. A computer can remain hot because of poor case ventilation, an incorrectly mounted cooler, aging thermal paste, or an unsuitable fan configuration. Cleaning helps address dust-related restrictions but cannot correct every cooling issue.
How to Clean Gaming PC Dust: Step by Step
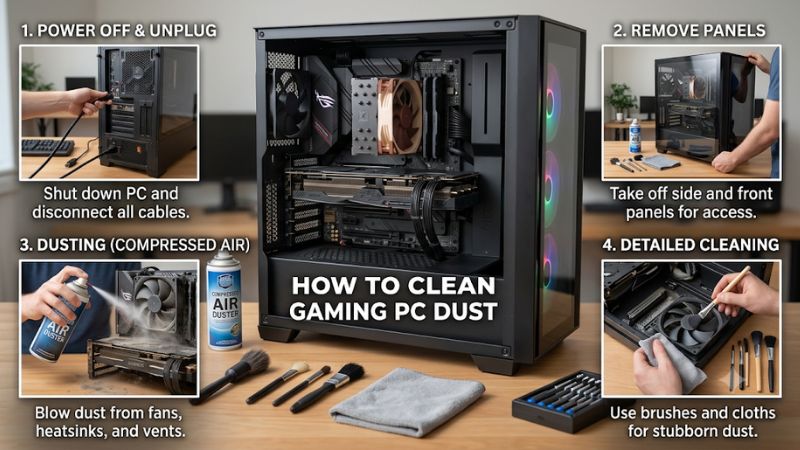
The safest approach is to work systematically, starting with external filters and moving toward internal cooling components. Before beginning, shut down Windows, switch off the power supply using its rear switch, and disconnect the power cable from the wall and computer. Move the system to a ventilated workspace where released dust will not immediately settle back inside.
Step 1: Shut Down and Open the PC Case
Completely shut down the computer instead of leaving it in sleep mode. Turn off the PSU switch, unplug the power cable, and disconnect external peripherals if they interfere with access. Pressing the power button briefly after disconnecting power can help discharge residual system power, but it does not make the PSU safe to open.
Remove the side panel according to your case manufacturer’s instructions. Place the panel on a stable surface and keep its screws together. If the case has removable front or top panels, check how they attach before applying force. Some panels use clips that can break when pulled incorrectly.
Step 2: Remove and Clean Dust Filters
Dust filters are among the easiest parts to clean and often provide the greatest immediate improvement in case airflow. Look underneath the case, behind the front panel, and across the top ventilation area. Their positions depend on the case design, so consult its manual if you cannot locate them.
Remove each accessible filter and use a soft brush or compressed air to remove loose dust. If the manufacturer permits washing, rinse the filter separately and allow it to dry completely before reinstalling it. Never put a damp filter back into the computer because residual moisture can reach nearby electrical components.
Tom’s Guide+1
Step 3: Clean Case Fans and CPU Cooling
Case fans and CPU coolers deserve careful attention because dust can accumulate between their blades and cooling fins. Use short bursts of compressed air while holding each fan blade stationary with a finger or an appropriate nonconductive tool. This prevents airflow from spinning the fan excessively.
For the CPU heatsink, direct air through the fins so loosened dust moves out of the cooling assembly. If the fan is removable according to its cooler instructions, you may remove it for better access, but disconnecting or dismantling the cooler is unnecessary for ordinary cleaning.
Step 4: Clean the Graphics Card and Remaining Components
The graphics card often collects substantial dust because its fans and heatsink move large amounts of air during gaming. Use compressed air carefully around accessible fan blades and heatsink openings. Hold the fans stationary and avoid inserting tools between the blades or forcing dust deeper into the cooler.
Continue with exposed motherboard surfaces, RAM modules, storage areas, and case ventilation openings. Use a soft antistatic brush for dust that does not come away easily. Avoid applying pressure to small components, connectors, or circuit-board surfaces. If dust is trapped deep inside a graphics card, professional cleaning may be safer than disassembling the cooler.
Cleaning Steps and Their Effects
The following table summarizes the main maintenance tasks, where to perform them, and the risks to consider when cleaning a gaming desktop.
| Setting or Step | Where | Effect | Risk |
| Disconnect power | PSU switch and power cable | Reduces electrical risk during maintenance | Forgetting connected power sources |
| Clean dust filters | Front, top, and bottom filters | Restores airflow through intake areas | Reinstalling filters before drying |
| Clean case fans | Front, rear, and top fans | Removes dust from fan blades | Allowing fans to spin excessively |
| Clean CPU cooler | CPU heatsink and fan | Removes dust between cooling fins | Bending fins or damaging fan cables |
| Clean GPU | Graphics card fans and heatsink openings | Clears accessible dust from GPU cooling | Damaging blades or small components |
| Clean PSU exterior | External PSU ventilation grille | Removes accessible external dust | Opening the PSU housing |
Step 5: Clean the Power Supply and Case Exterior
The power supply has its own cooling system and ventilation openings. Dust can accumulate around its external grille, particularly when the PSU draws air through a bottom-mounted case filter. Remove and clean the accessible filter first, then use gentle compressed air around the external grille if necessary.
Never remove the PSU casing or attempt to clean its internal components yourself. Even when disconnected, internal capacitors may retain hazardous electrical charges. If substantial dust is trapped inside the PSU, contact a qualified repair technician rather than opening the unit.
Finish by wiping the exterior case surfaces with a dry microfiber cloth. For stubborn marks, use a lightly dampened cloth on non-electrical exterior surfaces, keeping moisture away from ports, ventilation openings, and internal components. Never spray liquid directly onto the computer.
Dell US+1
How to Maintain a Dust-Free Gaming PC
Knowing how to clean gaming PC dust is only part of maintaining a healthy system. Your computer’s environment, case airflow, and filter configuration influence how quickly dust returns. A consistent maintenance routine can reduce buildup and help keep cooling performance more predictable between cleaning sessions.
1. Establish a Practical Cleaning Schedule
Most gaming desktops benefit from periodic filter inspections and more thorough internal cleaning when visible dust appears. The appropriate interval depends on the environment rather than a universal schedule. A computer sitting directly on carpet in a room with pets may collect dust faster than one positioned on a raised desk in a clean room.
A practical starting point is to inspect filters every one to three months and perform a more thorough inspection approximately every three to six months. Clean sooner if you notice significant accumulation. XMG’s maintenance guidance recommends cleaning filters at least every three to six months, although your environment may require more frequent attention.
XMG Help Center+1
2. Improve Case Airflow to Reduce Dust Buildup
Good airflow helps move heat away from the CPU, GPU, and other components. Most conventional gaming cases use front or bottom intake fans and rear or top exhaust fans. This arrangement provides a predictable path for cool air to enter and warm air to leave.
Positive air pressure can also help reduce dust entering through unfiltered gaps. This generally means slightly more intake airflow than exhaust airflow, with intake fans equipped with suitable filters. However, the ideal configuration depends on the case layout, radiator placement, and available fan mounts.
Intel
3. Monitor Temperatures After Cleaning
After reassembling the computer, reconnect its cables and start Windows normally. Listen for unusual fan noises and confirm that all fans operate as expected. Check CPU and GPU temperatures while the system is idle and during a familiar gaming workload.
Tools such as HWiNFO can display component temperatures, fan speeds, and other hardware readings. Compare the results under similar workloads rather than comparing an idle reading with a temperature recorded during a demanding game. If temperatures remain unusually high, investigate cooler mounting, fan operation, ventilation, and thermal interface conditions rather than repeatedly cleaning an already clean system.
4. Avoid Common Maintenance Mistakes
A good cleaning routine should protect the hardware rather than introduce additional risks. Use appropriate compressed air, keep fan blades stationary, and avoid unnecessary component removal. Make sure all filters are dry and correctly installed before reconnecting power.
Other useful habits include keeping the computer away from carpet, avoiding blocked ventilation openings, and maintaining reasonable clearance around the case. If you have pets, pay particular attention to front filters and lower intake areas because hair can combine with dust and form thicker deposits.
FAQ
1. How Often Should You Clean Dust From a Gaming PC?
You should inspect gaming PC dust filters every one to three months and perform deeper cleaning approximately every three to six months as a starting point. Systems in dusty rooms, homes with pets, or carpeted environments may need more frequent attention. Adjust the schedule according to visible accumulation rather than following a rigid calendar.
2. Can You Clean a Gaming PC Without Compressed Air?
Yes, you can remove some dust using a soft antistatic brush and a dry microfiber cloth on appropriate surfaces. However, compressed air is generally more effective for clearing dust from heatsink fins and difficult-to-reach areas. Avoid ordinary household vacuum cleaners inside the case because of static electricity concerns.
3. Can Dust Cause a Gaming PC to Overheat?
Yes, accumulated dust can contribute to overheating by restricting airflow through fans, heatsinks, and ventilation filters. This can increase fan speeds and potentially contribute to thermal throttling under demanding workloads. However, overheating can also result from inadequate cooling, poor ventilation, or cooler installation problems, so persistent high temperatures require further diagnosis.
4. Is It Safe to Use an Electric Air Duster on a Gaming PC?
An electronics-safe electric air duster can be suitable when used with controlled airflow and according to its manufacturer’s instructions. Avoid powerful air compressors or devices that produce excessive pressure. Always disconnect power, hold fan blades stationary, and maintain a safe distance from delicate components while cleaning.
Final Thoughts
Learning how to clean gaming PC dust is an important part of maintaining a reliable gaming setup. Regularly inspect filters, carefully clean fans and heatsinks, and monitor temperatures after maintenance. Avoid opening the PSU or removing components unnecessarily. Start with accessible dust filters and schedule deeper cleaning according to your environment.
More from Amazon
Programs that pair well with the guide above. Offers and eligibility are set by Amazon and may change.
Free shipping on eligible items, Prime Video and more. Eligible new members can start with a free trial.
Start a Prime free trialAd-free music streaming. Eligible new subscribers can start with a free trial.
Try Music Unlimited freeA Prime membership for ages 18-24 with a trial period. Eligibility is set by Amazon.
See Prime for Young AdultsAudiobooks and podcasts to listen to on the go. Eligible new members can start with a free trial.
Try Audible freeAs an Amazon Associate we earn from qualifying purchases.