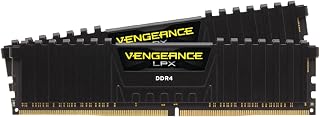
How to enable XMP in BIOS is a common question for PC gamers who discover that their RAM runs slower than the speed advertised on its packaging. Most memory kits start at a conservative default speed until you activate their stored performance profile. This guide explains the prerequisites, BIOS settings, verification process, and troubleshooting steps for Intel and AMD systems.
What Enabling XMP in BIOS Really Comes Down To
XMP, or Intel Extreme Memory Profile, is a memory overclocking technology that stores predefined frequency, timing, and voltage settings on compatible RAM modules. Activating the profile allows a supported motherboard and processor to configure memory beyond its standard default settings. Before changing anything, understand the difference between XMP, EXPO, and ordinary memory compatibility.
1. Understand What XMP Actually Does
RAM does not necessarily operate at the maximum speed printed on its product packaging when installed. Memory modules contain standard JEDEC settings and may also include performance profiles designed for higher operating frequencies.
XMP allows the motherboard to read a compatible profile and apply its specified memory frequency, timings, and voltage. Instead of entering each value manually, you select a predefined configuration in BIOS.
For example, a DDR5 memory kit advertised as DDR5-6000 may initially operate at a lower default speed. Enabling its supported profile can configure it for DDR5-6000, provided the motherboard, processor, and memory configuration can handle that setting.
2. Know the Difference Between XMP and AMD EXPO
XMP was developed by Intel, while AMD introduced EXPO (Extended Profiles for Overclocking) for compatible Ryzen platforms. Both technologies simplify memory overclocking by providing predefined settings stored on supported memory modules.
Intel systems generally use XMP, while modern AMD AM5 systems commonly use EXPO. Depending on the motherboard and memory combination, an AMD BIOS may also recognize XMP profiles through options such as DOCP or A-XMP.
The names vary between motherboard manufacturers. Check your memory specifications and motherboard manual before choosing a profile. Do not assume that every XMP kit automatically supports every AMD motherboard.
3. Check RAM, CPU, and Motherboard Compatibility
Before changing BIOS settings, confirm that your memory supports an XMP or EXPO profile. You can check the memory packaging, manufacturer’s specifications, or motherboard BIOS memory information.
Your motherboard and processor also determine which memory configurations are supported. The maximum achievable speed depends on the memory modules, motherboard design, BIOS version, and CPU memory controller. A profile’s advertised speed is not automatically guaranteed on every system.
For better compatibility, check the motherboard’s Qualified Vendor List (QVL). This list identifies memory configurations that the manufacturer has validated for particular motherboard models. Using a matched memory kit is preferable to combining separate kits with different specifications.
4. What Doesn’t Help When Activating XMP?
Installing additional RAM does not automatically enable XMP. Likewise, changing Windows power settings, updating graphics drivers, or installing memory-cleaning software will not activate a BIOS memory profile.
You also do not need to manually increase DRAM voltage or adjust memory timings just to enable a supported XMP profile. Those changes introduce additional variables and can make troubleshooting more difficult.
Start with the predefined profile provided by the memory manufacturer. Leave manual frequency, voltage, and timing adjustments untouched unless you understand memory tuning and have a specific reason to change them.
How to Enable XMP in BIOS: Step by Step
The general process is straightforward: enter BIOS, locate the memory profile setting, select the appropriate option, and save your configuration. However, motherboard interfaces differ between ASUS, MSI, Gigabyte, and ASRock. The following steps explain the common process while identifying the menu names you may encounter.
Step 1: Identify Your RAM Speed and Current Configuration
Before entering BIOS, check the advertised memory specifications. Look for the memory generation, rated speed, capacity, and supported XMP or EXPO profile.
You can also inspect the current operating speed in Windows:
- Press Ctrl + Shift + Esc to open Task Manager.
- Select Performance.
- Choose Memory.
- Locate the Speed entry.
Record the displayed speed before making changes. This gives you a reference for checking whether the new BIOS configuration has taken effect.
Remember that Windows reports memory speed in MT/s in current versions, although manufacturers and retailers frequently use MHz informally. DDR memory transfers data twice per clock cycle, so these terms are not technically interchangeable.
Step 2: Enter Your Motherboard BIOS
Restart your computer and press the appropriate BIOS access key repeatedly during startup. Delete and F2 are common options, although some manufacturers use different keys.
If Windows starts before you enter BIOS, restart and try again. You can also use Windows 11’s recovery menu:
- Open Settings.
- Select System, then Recovery.
- Find Advanced startup and select Restart now.
- Choose Troubleshoot.
- Select Advanced options.
- Choose UEFI Firmware Settings.
- Select Restart.
Your computer should restart into its firmware interface. If the UEFI Firmware Settings option is unavailable, consult your system manufacturer’s instructions for entering BIOS.
Step 3: Find and Enable the Correct Memory Profile
Once inside BIOS, look for a memory overclocking or performance section. Depending on the manufacturer, the setting may appear in EZ Mode or Advanced Mode.
Common locations include:
| Setting or Step | Where | Effect | Risk |
| XMP | Intel BIOS memory or overclocking menu | Applies a stored Intel memory profile | Memory instability |
| EXPO | Compatible AMD BIOS memory menu | Applies an AMD memory profile | Memory instability |
| A-XMP | MSI BIOS, usually under OC | Loads a compatible XMP profile | Unstable memory configuration |
| DOCP | Some ASUS AMD BIOS menus | Applies supported XMP memory settings | Compatibility limitations |
| EXPO Profile 1 | Supported AMD BIOS menus | Loads the selected EXPO configuration | Boot or stability problems |
The exact procedure differs by motherboard, but these examples provide a useful starting point.
ASUS motherboards: Enter Advanced Mode, commonly using F7, and open Ai Tweaker. Find Ai OverClock Tuner and select the appropriate XMP or EXPO option.
MSI motherboards: Open the OC section and locate the A-XMP or EXPO option. Select the available profile that matches your memory.
Gigabyte motherboards: Look under Tweaker or Advanced Memory Settings. Find Extreme Memory Profile (X.M.P.) or the corresponding EXPO option.
ASRock motherboards: Open the OC Tweaker section and look for the DRAM profile or XMP/EXPO configuration.
Choose a supported profile rather than manually entering frequency, voltage, and timings. If several profiles are available, begin with the standard manufacturer-provided profile rather than an experimental or enhanced option.
Step 4: Save Changes and Verify the New Speed
After selecting the memory profile, press F10 on most desktop motherboards to open the Save & Exit confirmation screen. Review the listed changes before confirming.
The computer will restart and may take longer than usual to complete its first boot. Memory training can involve additional startup time, particularly after changing memory settings. Avoid interrupting the process unnecessarily.
Once Windows loads, return to Task Manager and open Performance > Memory. Compare the displayed speed with the memory profile you selected.
For additional verification, CPU-Z can display the active memory frequency and timing information. Because DDR memory transfers data twice per clock cycle, a reported physical clock around 3,000 MHz corresponds to approximately 6,000 MT/s effective data rate.
FAQ
1. Is It Safe to Enable XMP in BIOS?
Enabling XMP is a common way to configure compatible RAM, but it is technically a form of memory overclocking. The profile uses predefined settings, yet the resulting configuration may exceed the processor’s officially supported memory specifications.
If the system becomes unstable, crashes, or fails to boot, return to BIOS and disable the profile. Intel and AMD both caution that operating components outside published specifications can affect warranty coverage and system reliability. Review the applicable CPU, motherboard, and memory warranty terms before proceeding.
2. Why Can’t I Find the XMP Option in BIOS?
The option may be missing because your motherboard does not support memory overclocking, your RAM lacks an XMP profile, or the firmware uses a different name. Some AMD systems display EXPO, DOCP, or A-XMP instead.
Prebuilt computers and laptops may also have restricted firmware menus. Check the motherboard documentation and memory specifications before assuming something is broken. If the option should be available but is missing, check whether the manufacturer provides a relevant BIOS update.
3. Does Enabling XMP Improve Gaming Performance?
Enabling XMP can improve gaming performance when the system was previously running memory below its supported performance profile. The difference depends on the processor, graphics card, game, memory configuration, and workload.
CPU-limited games and memory-sensitive applications may benefit more than GPU-limited games. However, enabling a faster memory profile does not guarantee a particular FPS increase. The best way to understand the impact is to compare the same game, settings, and system configuration before and after the change.
4. What Should I Do If My PC Won’t Boot After Enabling XMP?
First, allow the motherboard sufficient time to complete memory training. If the computer repeatedly fails to boot, power it down and follow the motherboard manufacturer’s recovery instructions.
You may need to clear CMOS using the designated motherboard jumper or button to restore default BIOS settings. Disconnect power and follow the manual’s safety instructions before performing this procedure. After recovery, disable XMP or select a less aggressive supported memory profile. If instability continues at default settings, investigate the RAM modules, slots, and motherboard compatibility.
Final Thoughts
Learning how to enable XMP in BIOS is a practical way to configure compatible RAM for its advertised performance profile without manually adjusting memory timings. Check compatibility, select the correct XMP or EXPO option, and verify stability afterward. If problems occur, restore default settings before troubleshooting further.
More from Amazon
Programs that pair well with the guide above. Offers and eligibility are set by Amazon and may change.
Free shipping on eligible items, Prime Video and more. Eligible new members can start with a free trial.
Start a Prime free trialAd-free music streaming. Eligible new subscribers can start with a free trial.
Try Music Unlimited freeA Prime membership for ages 18-24 with a trial period. Eligibility is set by Amazon.
See Prime for Young AdultsAudiobooks and podcasts to listen to on the go. Eligible new members can start with a free trial.
Try Audible freeAs an Amazon Associate we earn from qualifying purchases.