Applying thermal paste correctly helps transfer heat from your processor to its cooler, supporting stable temperatures during gaming and demanding workloads. how to apply thermal paste is a useful skill for PC builders and gamers replacing a CPU cooler, upgrading cooling hardware, or maintaining an existing desktop.
What Applying Thermal Paste to a CPU Really Comes Down To
Thermal paste fills microscopic gaps between the CPU’s integrated heat spreader (IHS) and the cooler’s contact plate. Without an appropriate thermal interface, trapped air can reduce heat transfer. The goal is to create a thin, consistent layer without applying excessive material or disturbing the cooler during installation.
1. Understand When Thermal Paste Is Needed
You need thermal paste whenever installing a CPU cooling solution that requires a separate thermal interface material. This includes most traditional air coolers, all-in-one (AIO) liquid coolers, and custom water-cooling blocks. However, some coolers already have thermal paste applied to their contact surfaces.
Before adding anything, inspect the bottom of your cooler. If you see a pre-applied thermal compound, you generally do not need another layer. Adding extra paste on top can create an unnecessarily thick interface and interfere with proper mounting.
Thermal paste is also necessary when reinstalling a cooler after removing it from the processor. The old compound should be cleaned away before applying a fresh amount. Intel specifically advises replacing previously applied thermal interface material rather than layering new compound over used material.
Intel+1
2. Choose the Correct Amount of Thermal Paste
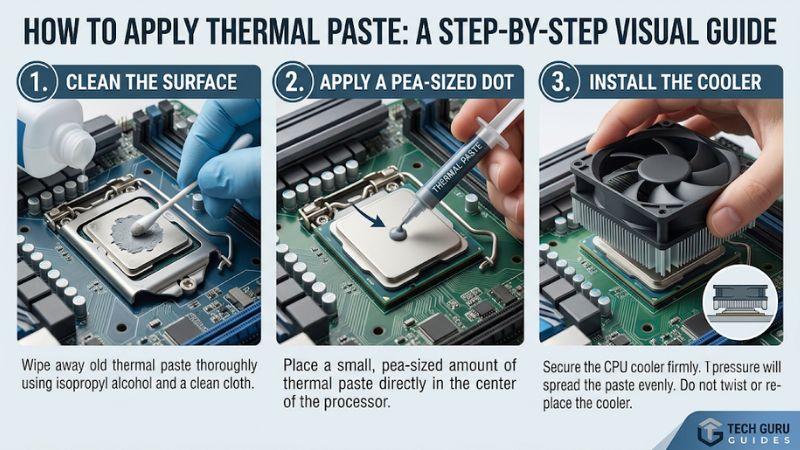
The amount of paste matters because the objective is to fill microscopic imperfections, not create a thick cushion between the processor and cooler. For many standard desktop CPUs, a small central dot approximately the size of a grain of rice or pea is a practical starting point.
Larger integrated heat spreaders may require a different application pattern to distribute the compound more evenly. A small line or X pattern can be appropriate depending on the processor’s shape and the thermal paste manufacturer’s instructions.
Avoid assuming that using more paste will automatically improve cooling. Excess material can squeeze beyond the CPU’s edges, creating unnecessary mess and potentially causing problems with certain electrically conductive compounds.
Intel+2
3. Prepare the Correct Tools and Workspace
You do not need an extensive toolkit to complete this task. A thermal paste syringe, lint-free cloth, isopropyl alcohol, and the appropriate screwdriver are generally sufficient. Keep your CPU cooler’s installation manual nearby because mounting mechanisms differ between manufacturers.
Work on a clean, stable surface with good lighting. Shut down the computer, switch off the power supply, and disconnect the power cable before opening the case. Touch grounded metal on the chassis or use an antistatic wrist strap to reduce electrostatic discharge risks.
If you are replacing an existing cooler, make sure the CPU and cooler contact surfaces are accessible and free from old compound. Do not touch the CPU’s delicate socket contacts or motherboard components unnecessarily.
What Doesn’t Help
Several common habits make thermal paste application more difficult without providing meaningful cooling benefits.
- Applying an excessively thick layer does not improve heat transfer.
- Adding fresh compound over old paste creates an uneven interface.
- Repeatedly lifting and repositioning the cooler can introduce air pockets.
- Using ordinary household glue, adhesive, or unrelated lubricants is not an appropriate substitute for thermal paste.
- Spreading a paste manually when its manufacturer recommends pressure-based distribution can create an inconsistent layer.
For example, ARCTIC specifically advises against spatula application for its MX-6 because of the compound’s high viscosity. Instead, the cooler’s mounting pressure distributes it across the contact surface.
ARCTIC+1
How to Apply Thermal Paste: Step by Step
The actual application process is straightforward when you prepare the cooler before dispensing the compound. Work carefully, follow the mounting instructions for your particular CPU and cooler, and avoid rushing the installation. These steps cover cleaning, dispensing, mounting, and checking the final result.
Step 1: Shut Down the PC and Remove the CPU Cooler
Start by shutting down Windows completely. Turn off the power supply using its rear switch, unplug the power cable, and disconnect other cables if they restrict access to the case. Remove the side panel and locate the CPU cooling assembly.
Disconnect the CPU fan or AIO pump connector before removing the cooler. Follow its mounting instructions to release the screws or retention clips. If the cooler has been installed for a long time, gently twist it to break the thermal paste seal before lifting it. Avoid pulling upward forcefully, particularly with AMD AM4 processors, because the CPU can sometimes stick to the cooler.
Step 2: Clean the CPU and Cooler Contact Surface
Use a lint-free cloth lightly moistened with isopropyl alcohol to remove the existing thermal compound from the CPU’s metal heat spreader. Clean the cooler’s contact plate as well, since residue on either surface can interfere with the new application.
Continue wiping gently until both surfaces are free of visible residue. Allow the alcohol to evaporate completely before proceeding. Avoid pouring liquid directly onto the motherboard, CPU socket, or other electronic components. Intel and AMD both provide guidance on cleaning old thermal compound before installing a cooler again.
Intel+1
Step 3: Apply a Small Amount of Fresh Thermal Paste
Place the CPU on its correctly installed motherboard socket and identify the center of its metal heat spreader. Dispense a small amount of thermal paste according to the manufacturer’s recommended application pattern. For many conventional desktop processors, a single central dot is sufficient.
Do not press the syringe too hard or dispense a large amount at once. If you are using a paste with specific instructions for larger CPU surfaces, follow those instructions instead of automatically choosing the central-dot method. Unless the paste manufacturer recommends manual spreading, allow the cooler’s contact pressure to distribute the compound naturally.
Step 4: Install the Cooler and Secure Its Mounting Screws
Position the CPU cooler directly above the processor. Lower it carefully onto the CPU without dragging it across the surface. Align the mounting brackets or screws with the motherboard’s designated mounting points before securing the assembly.
For coolers using four screws, tighten them gradually in a diagonal pattern to distribute pressure evenly. Avoid fully tightening one corner while the others remain loose. Once secured, reconnect the CPU fan to the CPU_FAN header or the appropriate pump and fan connections specified in your cooler manual.
| Setting or Step | Where | Effect | Risk |
| Clean old paste | CPU and cooler contact surfaces | Removes residue and prepares surfaces | Scratching surfaces or spilling alcohol |
| Apply thermal paste | Center of CPU heat spreader | Fills microscopic gaps | Too much paste can spill over |
| Mount the cooler | CPU mounting brackets | Creates even contact pressure | Uneven tightening |
| Reconnect and inspect | Motherboard fan headers | Restores cooling operation | Forgetting the fan or pump connection |
Step 5: Check the Installation Before Powering On
Before reconnecting power, inspect the cooler to ensure it is firmly attached and does not wobble. Check that the mounting screws or retention clips are secured and that no visible paste has spilled onto surrounding motherboard components.
Confirm that the CPU fan or AIO pump is connected correctly. If you accidentally removed the cooler after applying fresh paste, clean both contact surfaces and apply a new layer before reinstalling it. Do not simply put the same disturbed compound back into service.
Once everything is secure, reconnect the power cable and start the computer. Confirm that the cooling system operates normally and monitor CPU temperatures under ordinary workloads.
FAQ
1. How Much Thermal Paste Should I Apply to a CPU?
A small central dot approximately the size of a grain of rice or pea is sufficient for many standard desktop CPUs. Larger heat spreaders may benefit from a line or X pattern, depending on the manufacturer’s guidance. Avoid applying so much compound that it spills excessively beyond the CPU edges.
2. Should I Spread Thermal Paste Manually?
Usually, you do not need to spread thermal paste manually because the mounting pressure from the cooler distributes it across the CPU surface. However, some compounds and application methods have specific instructions. Always check the paste manufacturer’s recommendations before using a spatula or spreading tool.
3. Can I Reuse Thermal Paste After Removing the CPU Cooler?
No, applying fresh thermal paste is the recommended approach after removing the cooler. The original compound may have developed an uneven contact layer or trapped air during separation. Clean both surfaces thoroughly and apply a new amount before reinstalling the cooling assembly.
4. How Often Should I Replace CPU Thermal Paste?
There is no universal replacement interval because thermal paste formulations and operating conditions differ. You generally do not need to replace it every few months. Consider reapplication when removing the CPU cooler, performing cooling maintenance, or investigating unexpectedly increasing CPU temperatures. Check the manufacturer’s recommendations for your particular compound.
Final Thoughts
Learning how to apply thermal paste correctly is an essential PC maintenance skill, especially for gamers who regularly upgrade their cooling hardware. Clean contact surfaces, use an appropriate amount, and secure the cooler evenly. Follow your component manufacturer’s instructions and monitor CPU temperatures after installation to confirm everything works properly.
More from Amazon
Programs that pair well with the guide above. Offers and eligibility are set by Amazon and may change.
Free shipping on eligible items, Prime Video and more. Eligible new members can start with a free trial.
Start a Prime free trialAd-free music streaming. Eligible new subscribers can start with a free trial.
Try Music Unlimited freeA Prime membership for ages 18-24 with a trial period. Eligibility is set by Amazon.
See Prime for Young AdultsAudiobooks and podcasts to listen to on the go. Eligible new members can start with a free trial.
Try Audible freeAs an Amazon Associate we earn from qualifying purchases.